How to Press Flowers, According to Floral Pros

Preserve your blooms through the gloom of fall and winter with these tips
Learning how to press flowers is not as difficult as you might think. The technique makes an ephemeral beauty eternal by flattening the daisies, pansies, violets, and wildflowers that color your garden and turning them into enchanting home decor. “Bringing the outside in is always a good idea,” says Penny Ann Schmidt, a botanical artist based in Rialto, California, and owner of by Penny Ann. “Not only is nature beautiful, but preserving flowers also opens a window into a memory,” she offers.
Schmidt admits that exploring the art form of pressed flowers may be daunting for newbies. “The right method of preservation can be hard to figure out,” she says, adding that DIY-ing without some knowledge of how a given plant will dry can result in a failed press. To ensure that your blooms retain their charm, we asked Schmidt and other floral experts to explain the different methods for how to press flowers. AD DIY

How to Dry and Preserve Flowers Forever
Using parchment paper folded into heavy books is the most classic technique for how to press flowers, though thicker flowers that hold a lot of water run the risk of bleeding through the page
Considering the simplest of strategies for how to press flowers, the book method is one of your best bets. This is likely the cheapest technique for creating your ideal flower art. Assuming you already have large books, scissors, and your favorite flowers, it’s free. Schmidt notes that while the book method is easy and accessible, there are certain plants—like thicker flowers—that might not turn out well when pressed by heavy books. It’s best to pick flowers that are smaller or thinner for the book method. “Large flowers with thick layers should be pressed in other ways. Also, plants that hold a lot of water shouldn’t be used, as they will soak through the page,” she explains.
Kate Blott, creative marketing manager at Atlas Flowers in London, suggests looking for recently bloomed flowers that are not too damp when you’re using the book method. Schmidt is a fan of thin flowers (like wildflowers) and open-facing varieties like geraniums or coneflowers.
The best kinds of books to use to create your dry flowers masterpieces? “Have on hand a set of old encyclopedias or large dictionaries,” advises Linda Ruel Flynn, owner and artist at Flora-Ly in Orange, Masachussetts. “These books are best because the paper is often uncoated and porous. Pressing flowers in books with coated paper will not yield optimum results.” Phone books work for this craft project as well. Whichever tomes you choose to use, make sure they are heavy books. This process of preserving different types of flowers is suitable for all levels of flower art aficionados.

How to Press Flowers Using the Book Method
Smaller flowers are best for the book method, as larger ones can be unwieldy to arrange and fit for a press between the pages.
Step 1. Open your book and line with a single layer of parchment. “Choose a book you don’t mind damaging, as there may be some transfer of liquid and color from the flowers,” says Blott. Schmidt recommends avoiding paper towels as your absorbent paper, since the pattern on them can leave indents in the flowers or plants. Sheets of paper made of parchment work best.
Next, arrange your favorite flowers on the parchment. Be sure that you’re laying out the blooms to press the flowers into your desired shape or form. Avoid overlapping distinct blooms, says Blott.
If you have a big enough book, step three entails simply—but carefully—closing the page with your flower and lining more pages of the book for flower pressing. “Avoid packing too much into one book, as this will make it harder to weigh down,” Blott warns. After completing this step, close the book and add more on top.
For optimal results, Blott suggests letting the pressed blooms rest for at least a week to make sure the flowers dry before mounting them for display. Schmidt says to set a two-week waiting period for a safe drying process. The books should be left in a cool and dry environment, Schmidt adds. If the flower is brittle, that means all the water has left and it is now ready for decorating. Materials needed: Flowers; large, heavy books; parchment paper.

How to Press Flowers Using the Tile Method
The tile method for how to press flowers involves sandwiching the blooms between layers of parchment paper and tile for an even press.
Throughout Schmidt’s years of working with blooms, she’s found that using two tiles pressed together with adjustable straps to be the most dynamic way of pressing flowers. “You can choose to work with small tiles for tiny plants or large tiles for a bouquet of flowers,” she says. Using the tile method and parchment paper (or sheets of absorbent paper of your choice), Schmidt shares her tutorial for how to press flowers using the tile method below.

The tile method for pressing flowers takes about a week to dry fully, but this may vary depending on the size and type of bloom.
Step 1. Gather flowers and cut them in proportion to the tile size. Start with the bottom tile and then layer a piece of cardboard.
Lay absorbent paper atop it and then place your favorite flowers on the paper. Start with larger flowers, alternating the direction of the petals. Then, place a piece of paper on top, followed by another layer of cardboard.
Continue the sequence of sandwiching cardboard, paper, and flowers until you are finished stacking your flowers to press.
Finish by placing a tile on top and wrapping the strap around both sides. Check every two days for one week, replacing any damp paper. Disregard any rotten blooms—this is normal; flowers hold bacteria that isn’t visible, so don’t blame yourself for any moldy flower presses.
Tighten the press as flowers begin to flatten. After one week, open the press and allow your flowers to air-dry until crisp.
Materials needed: Flowers; two tiles; two adjustable straps; absorbent paper; cardboard; scissors
Estimated cost: $50 Skill level: Advanced

Pressing Flowers using the Mechanical Method
Another way to approach pressing flowers for framing or other home decor is by using a mechanical flower press. Blott notes that small mechanical presses are relatively budget-friendly.
The contraptions consist of two wooden boards with screws at each corner to squeeze sandwiches of cardboard and flowers. Tweezers may come in handy for this and other forms of dry flower pressing to help with precision when placing the dainty blooms.
Step 1: Create a flower sandwich using absorbent paper, cardboard, and flowers, starting by laying one piece of cardboard down and placing a sheet of parchment on top. Put the flower flat on the parchment and top off with another piece of parchment and a layer of cardboard.
Situate this arrangement on the bottom wooden press board and repeat. When your press has as many “sandwiches” in it as you want, place the top wooden press board in situ and begin to tighten the screws.

Mechanical presses tighten like a vise over the layers of pressed blooms, cardboard, and parchment paper.
Whatever it is, the way you tell your story online can make all the difference.
After the press is tightened, set aside for at least a week for the florals to dry into gorgeous dry flowers.

Tortilla Press
How to press flowers using a Tortilla Press
Like the book method, the tortilla press is an option for how to press flowers using an item that many already have in the home.
If you already have a tortilla press on hand, consider making flower art next taco Tuesday. Schmidt advises using open-facing and single-layer petals for this technique, like daisies and pansies. Best of all, the drying process with this method is swift and you don’t need to juggle pieces of wood, an ironing board, and the likes when gathering up materials for this DIY flower art project.
Step 1: Start by folding absorbent paper and placing a flower in between. Paper towels aren’t the best for this method, as the pattern can leave indents into the plant.
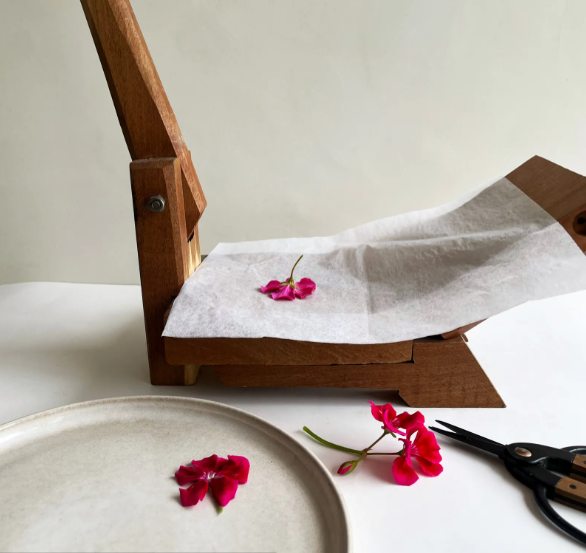
Tortilla Press Method
Then, lay the paper and flower face down on the tortilla press. Be sure to line the press with parchment paper.
Use moderate pressure to press the flower.
Move the flower and stem through the press, pressing the entirety of the flower. You will see the water squeezed from the blooms.
Replace the paper for each flower. Lay a clean and dry layer of paper on a cookie sheet and lay flowers out to dry. Keep in a cool, dry environment and out of direct sunlight.
Once the flowers are crisp, they are ready to use. Note that flowers with layered petals (like roses) may separate from the stem when pressed.
Materials needed: Flowers; tortilla press; absorbent paper; cookie sheet; scissors
Estimated cost: Around $35 Skill level: Intermediate